
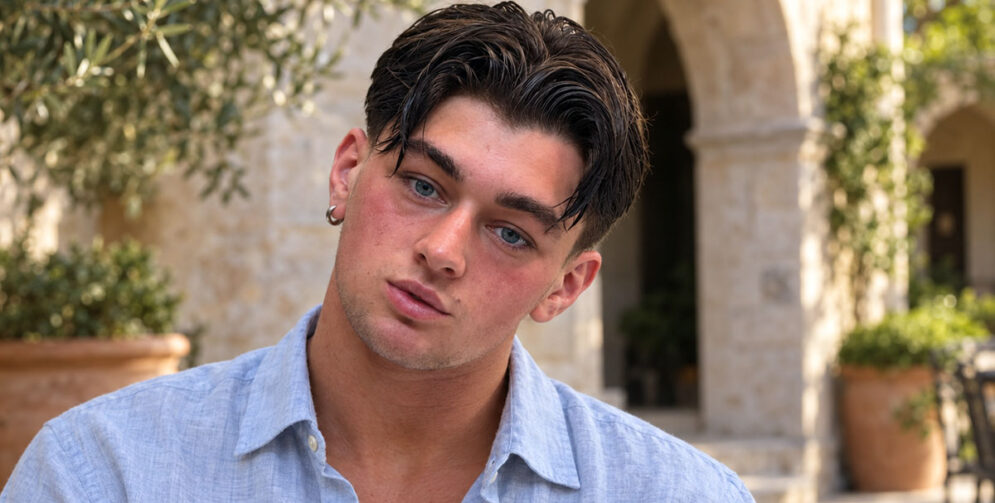
The middle part is a longer men’s hairstyle that has a clean center split, balanced shape and hair that moves away from the face. It can look neat and controlled, loose and textured, or full and flowing, depending on the length, layering and treatment around the sides. The basic idea is simple, but the wrong weight distribution can leave the top flat, make the sides flare or cause the front to fall straight into the eyes.
We focus on the choices that visibly change the result: how short the cut sits, where the front bends, how much hair you keep around the temples and whether the finish is sleek and pulled back or relaxed and slightly shaggy.
Below are 21 stylish examples of middle part haircuts for modern, style-savvy men, each with practical styling instructions, product guidance and the barber details that make the look work beyond the reference photo.
Best Middle Part Haircuts For Men
1. Trending Medium-Length Middle Part
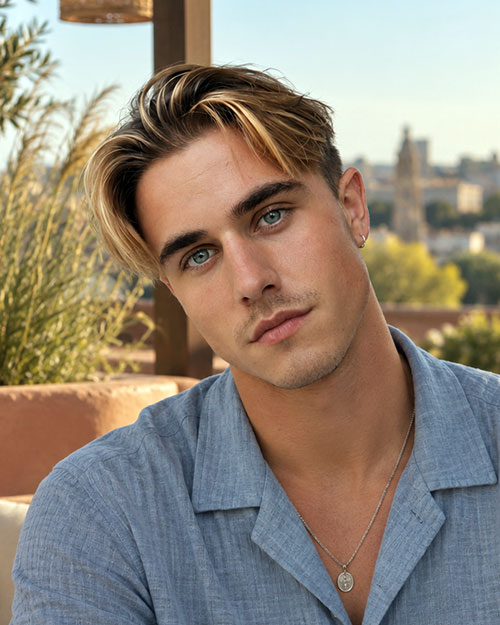
The balanced option. Medium length gives the hair enough room to frame the face and show movement without reaching the maintenance of a long style. The front usually sits between the cheekbones and jaw, while layers through the top and sides prevent the shape from becoming triangular. This length works particularly well on dense hair, but bulk must be removed internally without shredding the perimeter. Fine hair benefits from fewer layers so the ends continue to look substantial. The barber should also account for the area behind the ears, which is often where a medium cut begins to flare as it grows. A light taper or careful scissor work can keep that section clean while preserving the flow above it.
How To Style: Apply a light cream or sea-salt spray to damp hair, then blow-dry from the center outward with a vent brush. Lift the roots and curve the front away from the face. Finish by separating the ends with your fingers rather than combing the whole style into identical sections.
Best For: Straight, wavy or thick hair; most face shapes when the barber adjusts the front length and side volume to suit the features.
2. Classic Middle Part
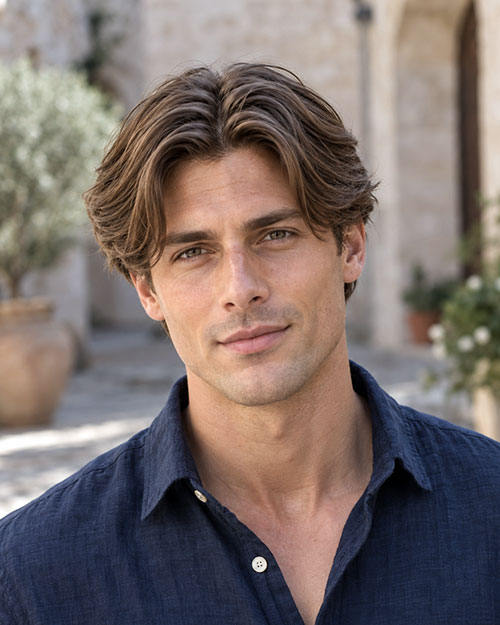
The classic middle part uses a clean center division and medium length that falls evenly to either side of the face. It looks controlled without requiring a sharp fade or obvious disconnection. The sides should retain enough weight to support the top, while light layering prevents the front from dropping as one heavy sheet. Straight hair produces the clearest line, although a slight wave can soften the shape. Ask for the front to reach at least the upper cheekbone when dry, with the corners blended rather than hollowed out. The cut should move naturally when the product wears off. If it only holds while heavily coated, the internal shape or drying direction probably needs adjustment.
How To Style: Apply a lightweight styling cream to damp hair, establish the part with your fingers and blow-dry each side away from the center. Lift the roots before directing the ends downward. Finish with a small amount of flexible paste through the mid-lengths, keeping heavy product away from the part line.
Best For: Straight or lightly wavy hair with moderate density; oval, oblong and square faces that suit balanced, face-framing length.
3. Curly Middle Part
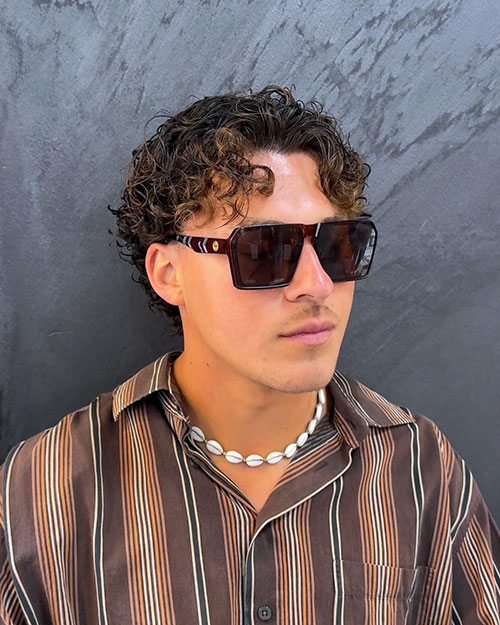
The curly middle part separates the top near the center while allowing coils or loose curls to form the fringe and side shape. The division may appear wider or less exact than it does on straight hair, and that is not a flaw. Curl pattern, shrinkage and crown direction determine how visible the part will be. The front needs enough length to fall to both sides after drying, often more than the finished image suggests. Cutting the fringe while stretched can leave it too short. I would keep the part natural, shape the curls in their normal position and preserve enough weight around the temples to avoid a mushroom-like top. A taper at the sideburns and neckline can sharpen the perimeter without removing the fuller silhouette that makes this version work.
How To Style: Distribute leave-in conditioner or curl cream through wet hair, then separate the center with your fingers. Scrunch each side away from the part and air-dry or diffuse gently. Do not comb the curls once dry. Twist only the front pieces that need clearer definition.
Best For: Loose curls, defined coils and dense textured hair; oval, oblong, diamond and heart-shaped faces with customized width at the sides.
4. Middle Part Curtains
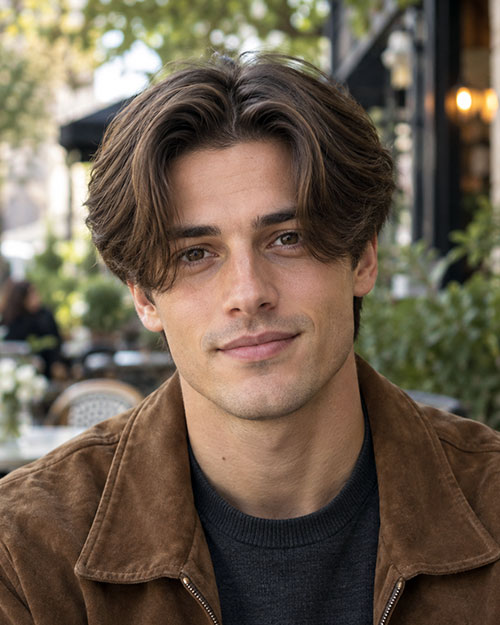
The recognizable 1990s version leaves the fringe long enough to separate and fall like curtains on both sides of the forehead. The front may sit near the cheekbones or extend toward the jaw, while the rest of the cut is layered to keep that length moving. It is softer than a short center part and places more emphasis on the face-framing pieces. The common mistake is removing too much weight directly behind the fringe, which creates two thin strips instead of a connected shape. I would keep enough density through the front corners, then add movement through the ends rather than thinning from the roots. Regular shaping matters even when the goal is relaxed because an overgrown crown can push the fringe forward and close the part.
How To Style: Mist damp hair with sea-salt spray, split the fringe and blow-dry each side back before letting it fall forward. That brief backward movement creates the curtain bend. Finish with a light cream on the ends, using less product near the roots so the front stays open.
Best For: Straight, wavy or softly curly hair; oval, oblong, diamond and heart-shaped faces that benefit from framing around the temples and cheekbones.
5. Textured Middle Part
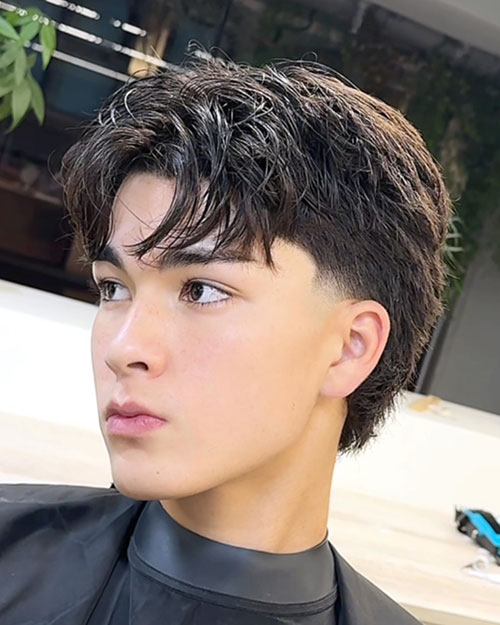
The textured middle part breaks the clean shape into visible layers and separated pieces. It still needs a readable center split, but the surface looks less uniform than classic curtains. This is useful on thick straight hair that tends to sit as one solid mass, and it can add the appearance of body when moderately fine hair has enough density at the hairline. Texture should be built through point cutting, channeling or well-placed layers, not indiscriminate thinning. Too much removal near the front exposes the part and leaves the fringe stringy. Ask for movement through the mid-lengths while keeping the ends strong. The finished cut should look convincing with minimal product, since styling cannot restore weight once it has been taken out.
How To Style: Spray damp hair with a light texturizer and blow-dry outward from the center while squeezing small sections. Once dry, work a flexible matte paste through the mid-lengths and ends. Pinch a few pieces around the front, but leave the root area loose enough to move.
Best For: Straight, wavy or dense hair that needs separation; oval, oblong and square faces that benefit from a softer, broken outline.
6. Short Middle Part
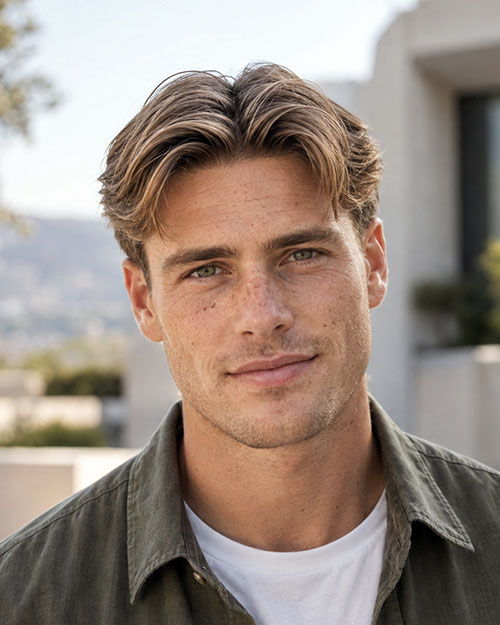
The short middle part keeps the top compact while leaving just enough front length to create a visible split. Instead of hanging around the face, the fringe bends outward and sits above the eyebrows. This makes the style easier to wear for men who like the symmetry of curtains but do not want medium-length hair. The front usually needs more length than the crown, with subtle graduation into the sides so the haircut does not resemble a disconnected shelf. Strong cowlicks may need more front length to settle. Ask the barber to check the part after drying because wet hair can hide where short pieces will spring up. The cut will lose its separation sooner than longer curtains, but it takes less time to wash, dry and control.
How To Style: Work a light matte paste into damp hair, then blow-dry the front up and away from the center using your fingers. Press the ends into a soft outward bend. Avoid strong clay at the roots, which can make the short top separate into stiff, exposed sections.
Best For: Straight or slightly wavy hair with moderate density; oval, square and round faces when the front retains a little height.
7. Messy Middle Part

This version keeps the center direction but allows the fringe, layers and ends to fall with deliberate irregularity. It should not look evenly combed or perfectly mirrored. The strongest examples have a properly balanced haircut underneath, which is why they settle into place even when the part shifts slightly. Natural waves make the finish easier, although straight hair can achieve it with layering and directional drying. A blunt, heavy front will resist the effect and repeatedly fall into the eyes. I would ask for softness through the ends and enough crown length to connect with the fringe, then avoid an overly polished neckline that fights the relaxed top. It can handle more grow-out than a sharp fade, but the shape still needs attention once the sides begin to swell.
How To Style: Apply sea-salt spray to damp hair and blow-dry in alternating directions, returning to the center split near the end. Rub a small amount of matte paste across your fingertips, then squeeze selected sections. Stop before the messiness turns into frizz or the fringe loses its opening.
Best For: Wavy, straight or thick hair; oval, square and longer faces that suit loose movement and an imperfect center line.
8. Wavy Middle Part
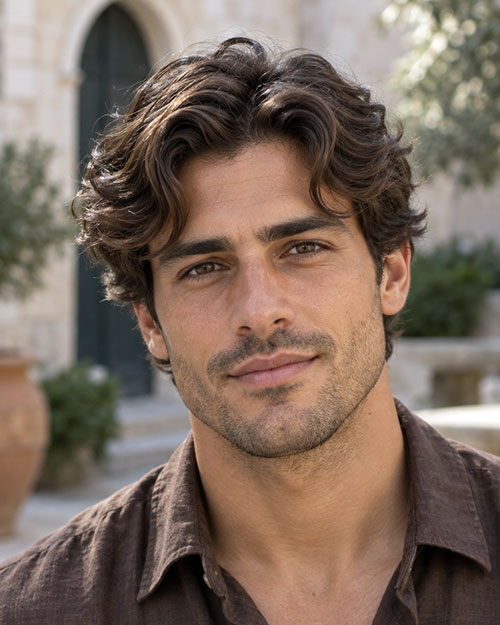
Natural bends give this version lift, movement and a softer frame around the face. Because the texture already supplies variation, the haircut needs fewer short layers than many men expect. Over-layering can make the sides expand and cause the ends to look dry, especially when the wave pattern changes from the front to the crown. The barber should cut with the hair’s dry position and shrinkage in mind, leaving enough weight for the waves to group together. A low taper can clean the perimeter, but full scissor-cut sides often make the movement look more continuous. The part does not need to form a severe straight line. A slightly irregular split usually works better with the texture and keeps the finish from feeling overly arranged.
How To Style: Apply a light curl cream or sea-salt spray to damp hair, create the part and scrunch both sides away from the center. Air-dry for softer movement or diffuse on low heat for more lift. Use a trace of flexible paste only where the front needs extra direction.
Best For: Naturally wavy hair with moderate or heavy density; oval, oblong, square and heart-shaped faces with adjusted volume around the cheeks.
9. Middle Part Flow
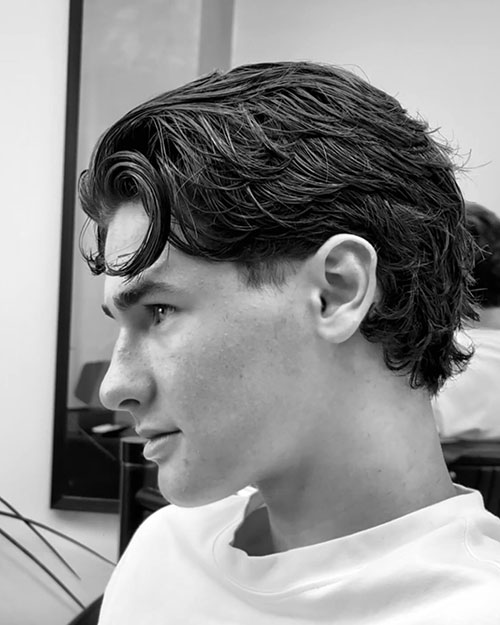
The middle part flow directs the hair away from the center and back around the ears, producing movement from the forehead through the sides and crown. Unlike curtains, the front does not simply hang downward. It lifts, bends back and connects into the longer shape behind it. This version requires enough length at the temples and upper sides to create continuity, so an aggressive fade works against the intended result. Layers should reduce bulk without interrupting the path of the hair. Men with strong forward growth may need more length and consistent blow-drying before the front stays back comfortably. Ask for a natural neckline and controlled weight around the ears. The goal is movement with structure, not an untrimmed grow-out.
How To Style: Apply a lightweight styling cream to damp hair, create the center split and blow-dry the roots upward before directing each side back. Use a vent or round brush to establish the bend. Finish with your fingers and flexible paste, keeping the lengths touchable rather than fixed.
Best For: Medium to thick straight or wavy hair; oval, square, oblong and heart-shaped faces that suit movement away from the forehead.
10. Middle Part with A Low Taper
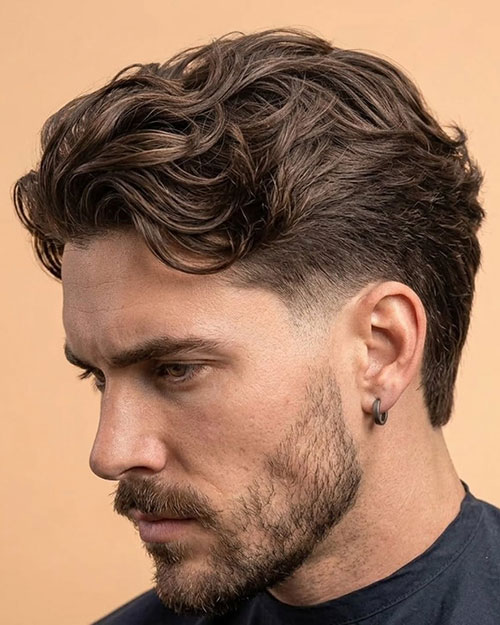
The middle part with a low taper keeps the fullness of a longer hairstyle while tidying the sideburns and neckline. The shortest work stays close to those edges, leaving most of the sides intact rather than fading a broad section around the head. That softer outline works well with both short curtains and longer, face-framing layers. The important detail is the weight above the ears: enough should remain to connect with the parted top, but excess bulk can make the sides puff outward. Ask for a low, subtle taper with scissor work through the upper sides. The front should stay long enough to separate naturally when dry, without needing heavy product to force the opening.
How To Style: Apply a lightweight styling cream to damp hair and establish the center split with your fingers. Blow-dry each side away from the part, lifting the front slightly before letting the ends settle. Finish with a small amount of flexible paste through the lengths, smoothing the hair above the ears without flattening the whole shape.
Best For: Straight or wavy hair with moderate to thick density; oval, square and longer faces that benefit from some fullness at the sides.
11. Blowout Middle Part
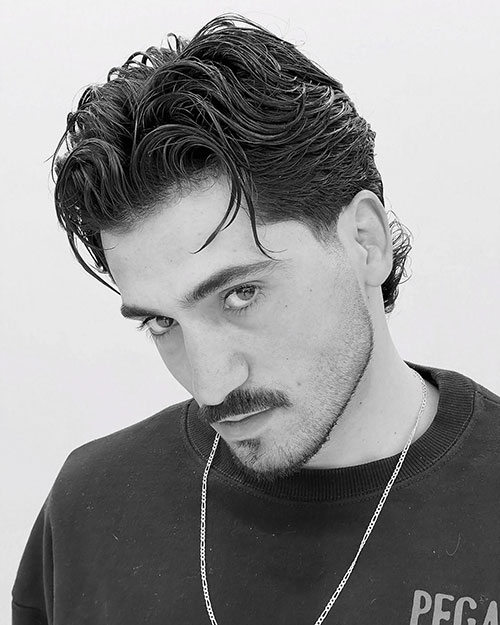
More height, more width and a stronger front bend. The blowout middle part lifts the roots before the hair separates, creating a fuller silhouette than flat curtains. It works best when the front has enough length to arc away from the face without falling back into the center. Dense straight hair often needs internal weight removed so the shape can rise, while fine hair needs fewer layers and a lighter product to avoid collapse. The sides may stay full or receive a restrained taper, but taking them too short can make the elevated top look isolated. Ask for the front and crown to remain connected. If the crown is cut too short, the blowout can form a high front with a flat area directly behind it.
How To Style: Apply volumizing mousse or sea-salt spray to damp hair. Blow-dry the roots up and back, then use a round brush to bend both front sections away from the center. Let the hair cool in position before adding a light paste or texture powder for support.
Best For: Straight, wavy or moderately fine hair that can hold lift; round, square and oval faces that benefit from added height.
12. Middle Part with Tapered Sides
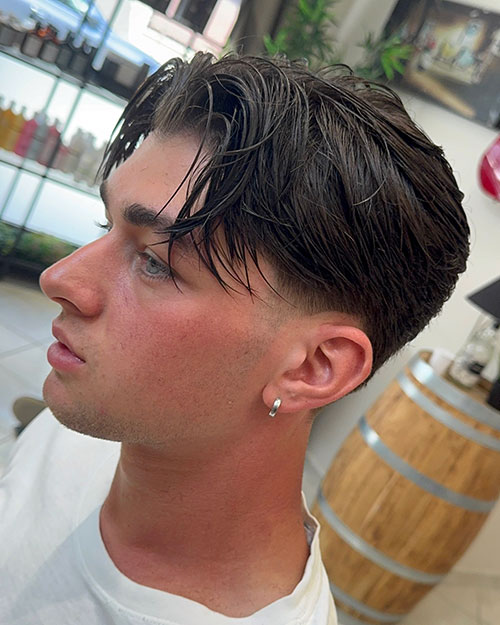
The middle part with a taper keeps the flowing shape intact while cleaning the sideburns and neckline. Most of the sides remain at their natural length, so the transition feels softer than a conventional fade and grows out without a broad band of short hair. This makes curtains look deliberate in professional settings without sacrificing movement around the temples. The taper should stay close to the perimeter. Raising it too far removes the support under the parted top and changes the proportions of the cut. Ask the barber to blend the temple area into the longer sides while preserving enough hair to tuck behind the ears if the reference requires it. The result is neat at the edges but still relaxed through the top.
How To Style: Work a light styling cream into damp hair and blow-dry away from the center with your fingers or a vent brush. Add a slight backward curve at the front. Use the remaining product on your hands to settle the sides, keeping the tapered areas clean and free of buildup.
Best For: Straight, wavy or lightly curly hair; most face shapes and men who want a cleaner perimeter without losing side weight.
13. Middle Part with A Low Fade
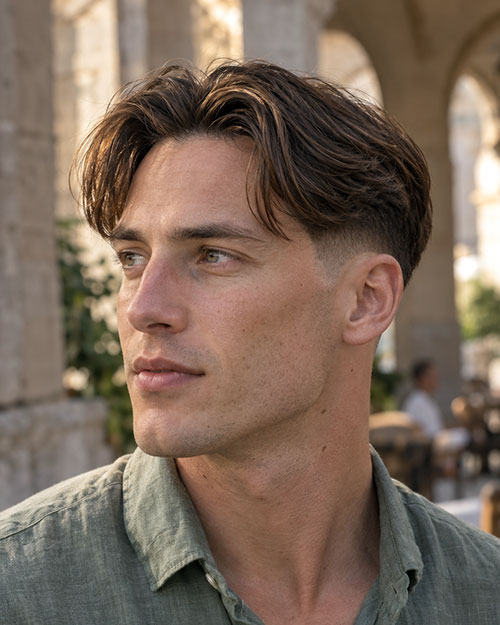
This cut begins the fade close to the ears and neckline, creating contrast beneath the longer, divided top. Compared with a low taper, the short graduation covers more of the sides and removes additional weight. Compared with a mid or high fade, it leaves enough darkness above the ears to support the middle part. The fade may finish at skin or retain a short shadow, so the reference image should show the exact result you want. The barber needs to blend into the corners without chasing the transition upward. A low fade that climbs too high can narrow the head and leave the top looking disconnected. It will also need cleaning up sooner than scissor-cut sides because the contrast softens as soon as the shortest hair begins to grow.
How To Style: Apply a lightweight paste to damp hair, set the center split and blow-dry both sides outward with moderate lift. Keep the finish controlled near the temples so the longer hair does not flare over the fade. Use only enough product to maintain separation and shape.
Best For: Straight, wavy or dense hair; oval, square and round faces when the upper sides retain enough weight to balance the fade.
14. Long Middle Part

The long middle part carries the divided shape beyond the jaw and sometimes toward the shoulders. At this length, the haircut depends less on fade work and more on healthy ends, controlled layers and balanced density from front to back. Long straight hair can fall flat against the head, while thick or wavy hair may widen around the cheekbones unless the layers are placed carefully. I prefer removing weight through the interior while leaving the outside line strong enough to look intentional. The part can remain precise or shift naturally throughout the day, but the front should connect into the longer sides rather than looking like separate bangs. Expect fewer full haircuts, with smaller trims protecting the ends and face-framing shape.
How To Style: Use leave-in conditioner or a smoothing cream on damp hair, then blow-dry downward while lifting lightly at the roots. Direct both front sections away from the face. Finish with a drop of hair oil through the ends, avoiding the scalp so the center does not look greasy.
Best For: Medium to thick straight, wavy or curly hair; oval, square and heart-shaped faces that suit longer framing and reduced height.
15. Middle Part with A Skin Fade
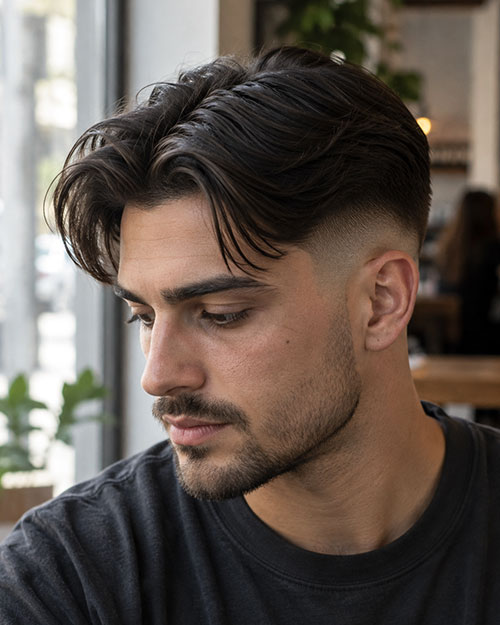
The middle part with a skin fade creates the clearest break between the longer top and bare lower sides. Skin describes the starting length, while the fade may still be placed low, mid or high. Agree on that placement before the first guideline is made. A lower version preserves more support around the temples; a higher version makes the parted top look narrower and more disconnected. The contrast photographs sharply, but it exposes head shape, scalp marks and regrowth. Men with very fine hair should be cautious because the bare sides can make limited density on top more noticeable. This option earns its place when you want the fade to be a visible feature, not simply because it seems cleaner than a softer taper.
How To Style: Blow-dry damp hair up and away from the part, then use a matte paste or light clay to keep the top separated. Build controlled volume through the front so it holds its own against the bare sides. Avoid shine at the roots, which can expose more scalp under strong contrast.
Best For: Dense straight or wavy hair; oval, square and round faces when the head shape supports exposed sides and stronger contrast.
16. Middle Part Undercut
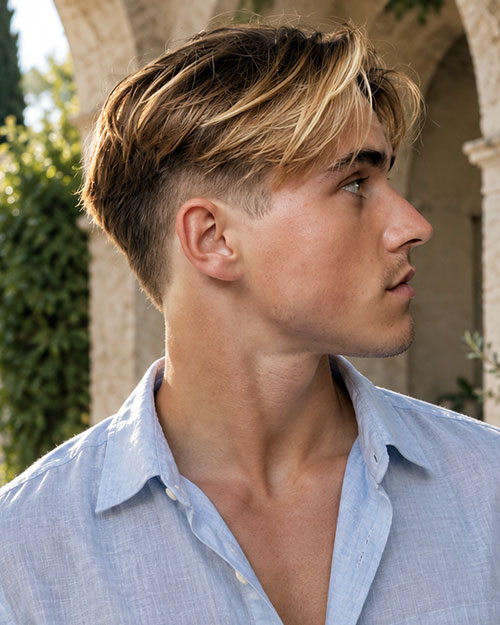
The middle part undercut pairs a long divided top with sides and back that are cut short without a gradual blend into the upper length. That disconnection creates a pronounced overhang and makes the center-parted section appear fuller. It is different from a fade, where the lengths transition progressively. The top needs enough width to cover or intentionally reveal the disconnect. Thick hair may require internal weight removal, but the perimeter should remain solid so it does not break into thin pieces above the short sides. Ask where the undercut will sit and whether the back should connect. A line placed too high can make the shape difficult to grow out and limit how the hair can be worn when it is not parted.
How To Style: Apply sea-salt spray or light paste to damp hair and blow-dry each side away from the center, lifting at the roots. Let the longer top fall over the undercut rather than pressing it flat. Finish with flexible product through the ends to control separation without emphasizing the disconnect excessively.
Best For: Straight, wavy or thick hair with enough density to cover the transition; oval, square and round faces that suit stronger side contrast.
17. Two Block Middle Part
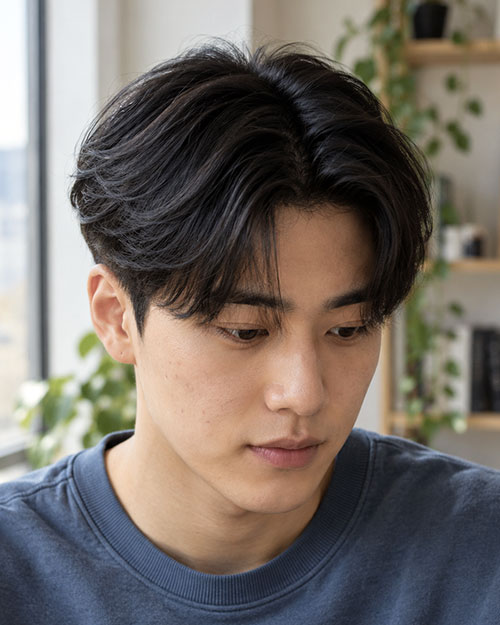
Two distinct length zones create the structure here: a longer upper section and noticeably shorter sides and back. The center split then shapes the top around the face. Unlike a fully exposed undercut, the shorter lower section can sit partly hidden beneath the upper layer, creating contrast without requiring bare sides. The top often needs debulking on dense, straight hair so it bends instead of forming a cap. The area above the ears is critical. Removing too much creates a gap between the fringe and sides, while leaving too much can make the lower block disappear. Ask for the top length, side length and degree of connection separately. The label alone does not tell the barber how subtle or pronounced the two sections should be.
How To Style: Apply a light cream to damp hair and blow-dry the roots upward, directing the front into two soft curves. Use a round brush if the hair resists bending. Finish with flexible paste on the ends, keeping the upper layer smooth enough to sit over the shorter sides.
Best For: Straight, dense or softly wavy hair; oval, oblong and heart-shaped faces that suit a fuller top with controlled lower sides.
18. Shaggy Middle Part

The shaggy middle part combines a loose center split with longer layers around the ears, crown and nape. It feels more grown in than conventional curtains but still requires deliberate weight distribution. Short layers at the crown create lift, while longer perimeter pieces keep the style from becoming round or overly feathered. Wavy hair supplies the easiest movement. Straight hair can wear it, but the ends need enough texture to avoid falling into two flat panels. The barber should leave irregularity without cutting every section to a different length. Heavy thinning is risky because shaggy hair depends on visible density at the ends. This cut tolerates a softer grow-out, although the fringe and area around the ears may need reshaping before the back feels too long.
How To Style: Apply sea-salt spray or lightweight cream to damp hair, then blow-dry with your fingers while keeping the center direction loose. Lift the crown and squeeze the longer ends. Finish with a flexible matte paste, allowing a few pieces to cross the part so it does not look overly exact.
Best For: Medium to thick straight or wavy hair; oval, square and longer faces that suit layered width and a relaxed outline.
19. Slick Middle Part

The slick middle part keeps the center line visible while directing both sides back into a smooth, controlled finish. It is more formal than textured curtains and less severe than combing the hair straight back. The cut needs enough length at the front to lie behind the natural bend, with clean blending around the ears and neckline. Fine hair can wear a lighter version, but too much shine may reveal the scalp along the part. Thick hair needs internal weight removed so it stays close without requiring excessive product. Ask for a connected scissor-cut shape or conservative taper rather than assuming a fade. The polish comes from styling, not necessarily short sides. Product buildup quickly makes this version look greasy, so begin with less than expected.
How To Style: Comb a light pomade or grooming cream through damp hair, create the center part and blow-dry both sections back on low heat. Refine the direction with a wide-tooth comb, then use your fingers to loosen the surface. Choose light to medium shine rather than a wet, heavily coated finish.
Best For: Straight or wavy hair with moderate density; oval, square and diamond faces, plus professional or formal settings that favor control.
20. 1990s Middle Part
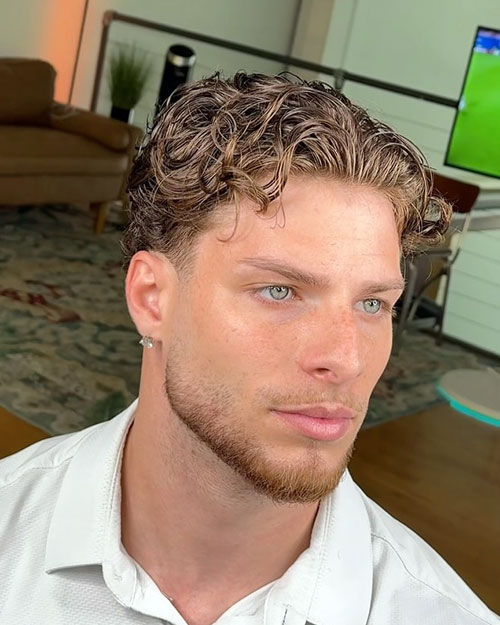
The defining 1990s version has a longer, center-parted fringe that falls toward the cheekbones, with enough weight through the top to create its loose, face-framing shape. Unlike a polished middle part, it should look soft and slightly floppy rather than sharply divided. The sides are usually scissor-cut or gently tapered, which maintains fullness and avoids the severe contrast of a skin fade. Ask for long layers through the front and crown, with the ends softened but not heavily thinned. Removing too much density behind the fringe can leave both sections looking weak and stringy. It grows out comfortably, although the front should be reshaped once it falls into the eyes instead of opening around them.
How To Style: Apply sea-salt spray or a lightweight styling cream to damp hair. Create the center split, then blow-dry the front back and outward before allowing it to fall forward. Finish with a small amount of flexible paste through the ends, keeping the roots loose and touchable.
Best For: Straight or softly wavy hair with moderate density; oval, oblong, square and heart-shaped faces that suit longer framing around the forehead.
21. Textured Middle Part Flow with Taper Fade
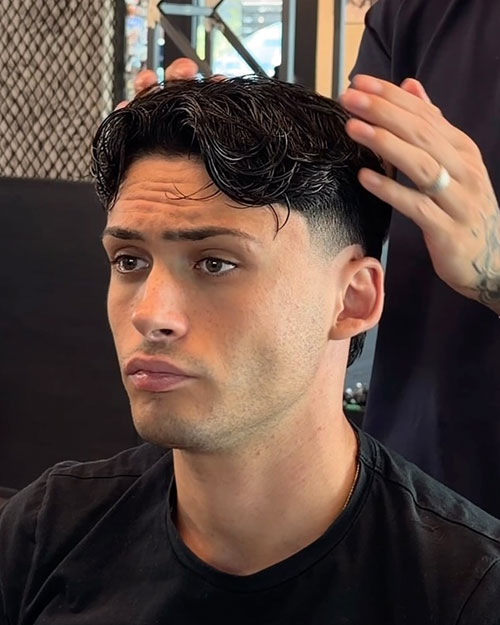
The textured middle part flow with a low taper fade combines swept-back layers with a clean finish at the sideburns and neckline. The front lifts away from the center, then travels back through the sides instead of hanging forward like curtains. Piecey separation keeps the longer top relaxed, while the taper sharpens the outline without stripping away the fullness that makes the flow work. Keep the shortest clipper work low and concentrated around the edges. Taking it too high removes the connection between the temples and the longer hair behind the ears. Ask for enough front length to bend backward, with internal weight removed selectively. Over-thinning the ends can leave the style fluffy rather than textured.
How To Style: Apply a lightweight styling cream to damp hair, establish the center split and blow-dry the roots upward before directing both sides back with a vent brush. Let the front cool in that curved position. Finish with a small amount of flexible matte paste, separating selected pieces through the ends without flattening the roots.
Best For: Medium to thick straight or wavy hair; oval, square and heart-shaped faces that suit an open forehead and controlled fullness around the temples.
What Is A Middle Part Haircut?
A middle part is a modern, medium-length men’s hairstyle that divides the hair near the center of the head so the top falls or sweeps to both sides. Most versions need enough length at the front to separate cleanly, with the sides left full, tapered, faded or disconnected according to the intended shape. The part should usually look natural rather than shaved into the scalp.

Middle parts and curtains are closely related, but they are not identical. Curtains use a longer divided fringe that hangs down and frames the face. A middle part can also be cut shorter, brushed back into a flow or styled with a cleaner, more controlled finish. The best version follows the natural growth pattern. If a cowlick prevents a perfectly centered split, moving the part slightly can look more balanced than forcing the hair against itself.
How To Style A Middle Part Haircut
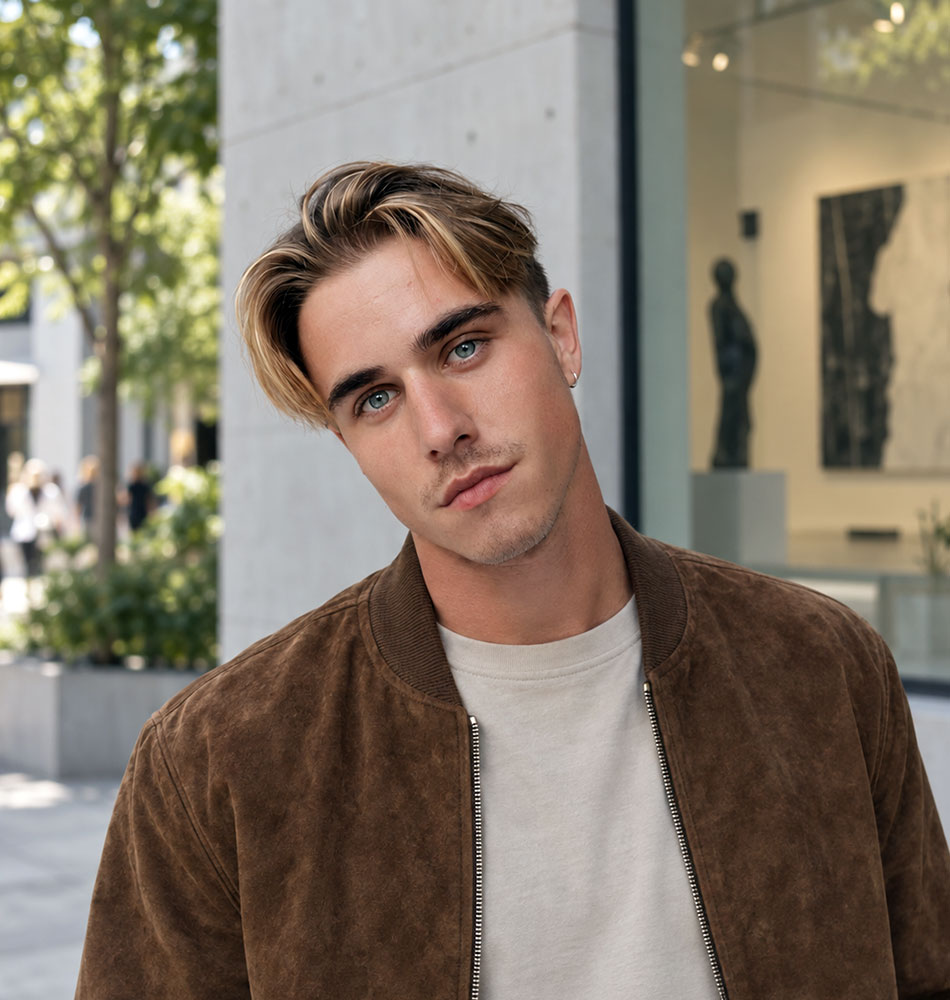
A convincing middle part depends more on root direction than strong hold. Lightweight creams, sea-salt sprays and flexible pastes usually work better than dense waxes because the hair needs to separate and move. The main variable is your natural growth pattern. Establish the split while the hair is damp, then use airflow to teach both sides where to sit.
- Start with damp hair. Towel-dry until the hair is no longer dripping but still flexible enough to redirect.
- Find the natural center. Use your fingers or a wide-tooth comb to divide the hair, shifting slightly if a cowlick prevents a balanced split.
- Add a light pre-styler. Use sea-salt spray for texture, styling cream for control or curl cream for natural bends and coils.
- Lift the roots first. Blow-dry upward along the part before directing each side away from the center. This prevents a flat, exposed line.
- Shape the front. Use your fingers or a round brush to create the outward curtain bend, then allow the hair to cool in position.
- Finish from the back forward. Apply a small amount of flexible paste or cream through the mid-lengths and ends, using very little near the part.
What To Tell Your Barber

Bring a reference that shows the front, sides and overall length, then explain whether you want curtains that fall toward the face, a flow that moves back or a shorter split that sits above the eyebrows. Ask the barber to keep enough front length for your hair to divide when dry and to account for any cowlick near the hairline or crown.
Be specific about the sides. A scissor cut, low taper, low fade, skin fade, undercut and two block create different silhouettes even when the top is identical. If you want a softer result, ask to preserve weight above the temples and around the ears. For a cleaner contrast, agree on the fade height and shortest length rather than saying only, “short on the sides.”
How Long Does Your Hair Need To Be?

Most middle parts need roughly three to five inches at the front, although the right length depends on the finish. A short version may separate with about three inches, while curtains usually need enough hair to bend and fall toward the cheekbones. Flowing or tucked styles require additional length around the sides as well as the fringe.
Growth pattern matters as much as measurement. Coarse hair that stands upright may need extra length before gravity helps it fall, while fine straight hair can split sooner. Curly hair must be measured in its dry position because shrinkage can make a seemingly long fringe sit much higher after styling.
Who Does A Middle Part Suit?
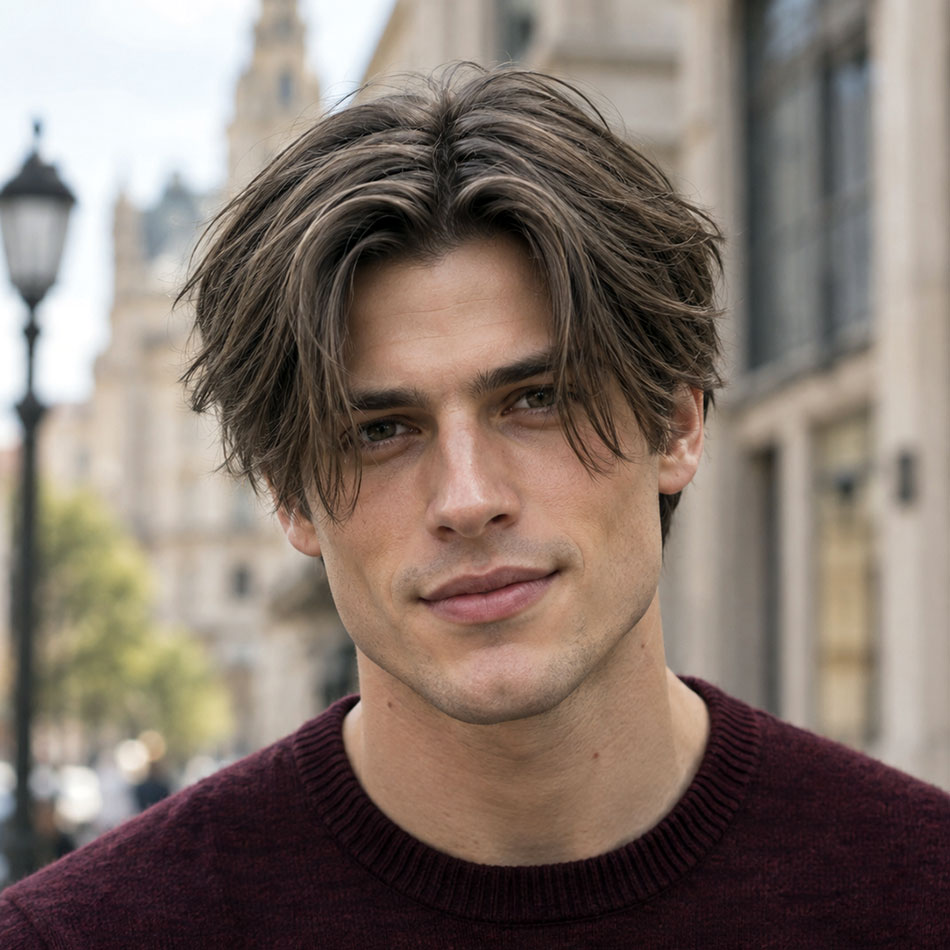
A middle part can work across most face shapes when the length and volume are adjusted. Longer, lower curtains add width and can soften oblong or angular features. A shorter version with root lift can give a rounder face more vertical balance. Men with heart-shaped faces often benefit from movement around the temples and cheekbones, while square faces can carry either a clean or relaxed finish.
Hair behavior is the more important test. The style is easiest on straight, wavy or loosely curly hair with enough density to form two connected sections. Fine hair may need fewer layers and less product. Strong cowlicks can require a slightly shifted part, and tight curls need more length than the finished shape suggests.
FAQs
What Is A Middle Part Haircut?
A middle part haircut divides the longer hair on top near the center so it falls or sweeps to both sides. The front may form short bends, longer curtains or a brushed-back flow. The sides can remain full, tapered, faded or disconnected, but the visible central split and balanced direction define the style.
What’s the Best Way to Style A Middle Part Haircut?
The best method is to establish the part on damp hair, apply a lightweight cream or sea-salt spray and blow-dry the roots up before directing each side outward. Finish with a small amount of flexible paste through the lengths. Heavy wax at the roots can flatten the style and make the part look wider.
How Long Does Hair Need To Be For A Middle Part?
About three inches at the front is enough for some short middle parts, while classic curtains commonly need four to six inches or more. The hair must be long enough to clear its natural growth pattern and bend to either side. Coarse, curly or strongly forward-growing hair usually requires additional length.
Can You Train Your Hair to Part in The Middle?
Yes, consistent damp styling and directional blow-drying can help hair settle into a middle part over time. Create the split after washing, dry both sides away from the center and let the hair cool in place. A strong cowlick may prevent a perfectly centered line, in which case a slightly off-center placement will look more natural.
Does A Middle Part Work with A Receding Hairline?
It can. Longer curtain pieces may soften mild recession by falling around the temple areas, but a wide or heavily flattened part can also expose more scalp. Keep sufficient density through the front, avoid aggressive thinning and consider shifting the split slightly if the natural hairline looks uneven at the exact center.
How Often Should You Cut A Middle Part?
Most medium and long middle parts benefit from reshaping every six to eight weeks. Short versions, low fades and skin fades may need attention every two to four weeks to preserve their outline. Men growing the style longer can space out full cuts, but small trims around the fringe, ears and neckline keep the shape deliberate.
The Conclusion: Choosing The Right Middle Part Is Everything
Choose the version that works with your natural movement before deciding how much contrast to add. Straight hair can support clean curtains, texture or a polished finish. Waves and curls usually look better when the cut protects their grouping and leaves enough length for shrinkage. If you are uncertain, start with medium length and a low taper. It preserves the most styling options and is easier to adjust at the next appointment than a high disconnect or skin fade.
